Why add a transparent window to a pouch?
A transparent window can help shoppers inspect the product's appearance, size or texture before purchase. It can be useful for nuts, seeds, granola, dried fruit, snacks and other products where visual presentation supports the buying decision.
A window is a design feature, not simply a hole in the printed artwork. The clear film must be incorporated into the pouch construction and sealed as part of the converting process. Its size and location should be reviewed together with the product and the required package performance.
Common transparent window shapes
Rectangular window
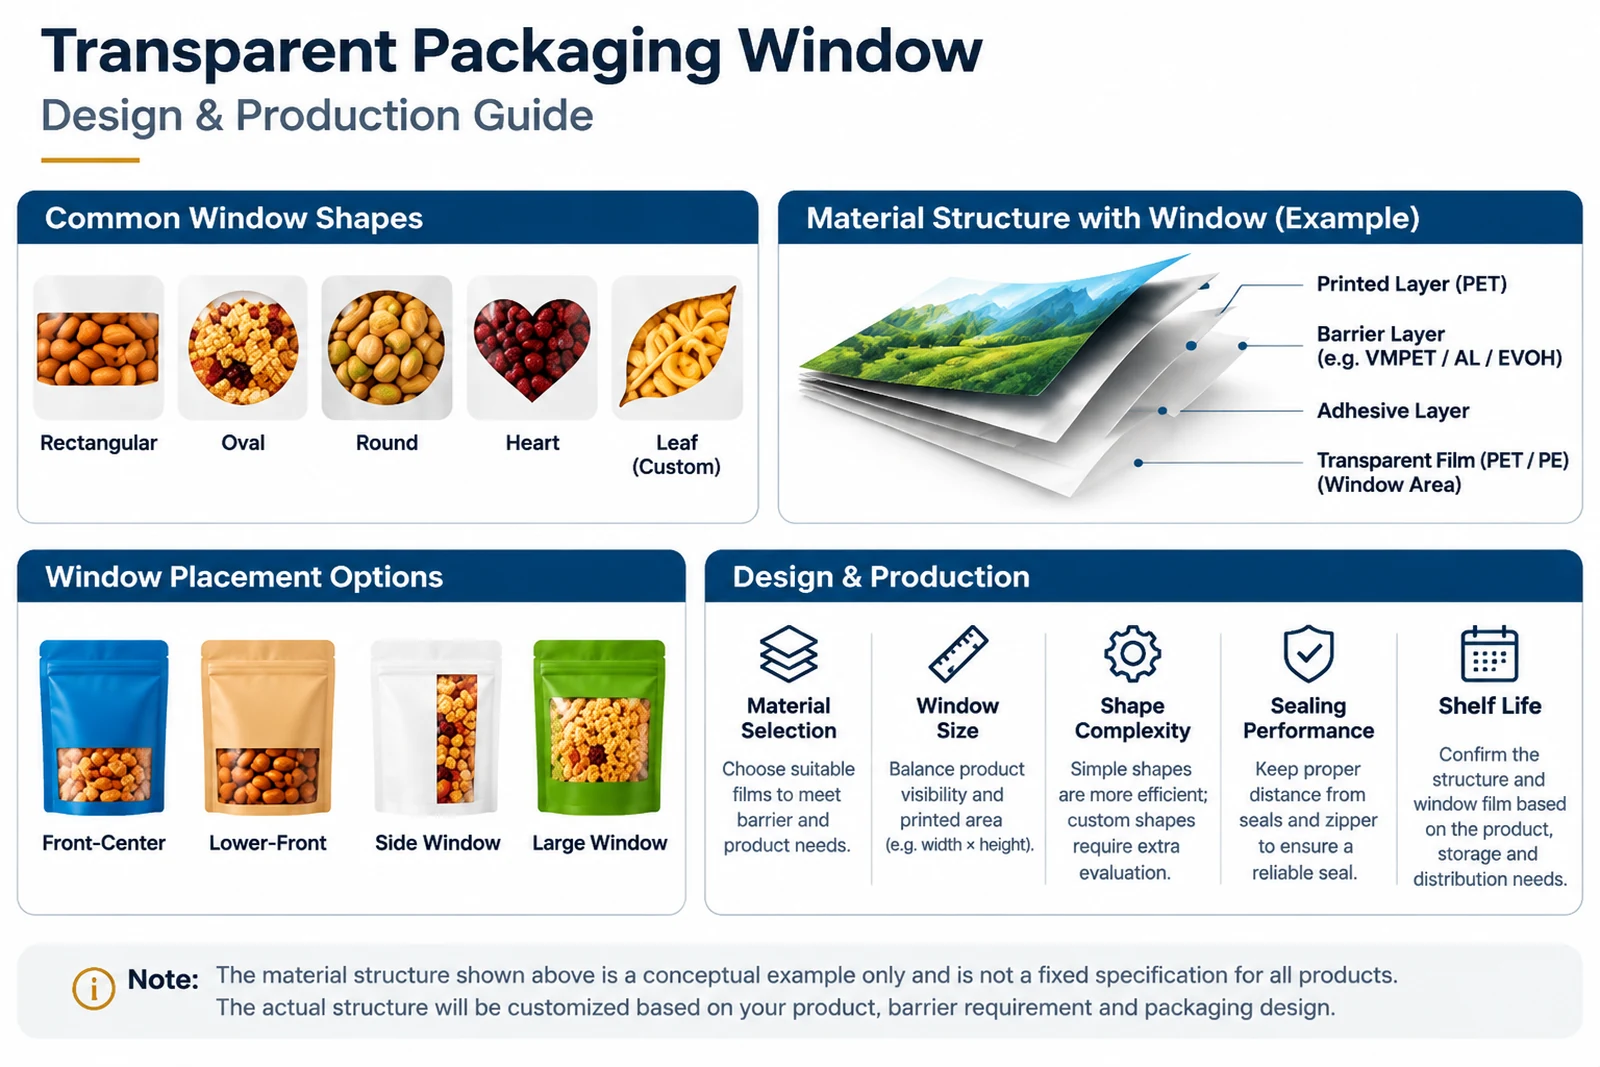
A rectangular window provides a broad, simple viewing area and is often practical for showing the product clearly. It can be placed on the front panel, commonly below the main brand and product information.
Oval or round window
Oval and round windows create a softer visual style. They can work well as a smaller product-viewing feature, while keeping more of the front panel available for printed graphics.
Custom shapes
Heart, leaf and other custom outlines can help a pouch stand out. More complex shapes require careful review of the die line, clear-film placement, registration and sealing layout before artwork approval.
Where should the window be positioned?
- Front-center: gives the product a prominent viewing area, but must be balanced with the logo and required product information.
- Lower-front: keeps the upper panel available for branding while showing the product near the base of the pouch.
- Side window: offers a distinctive detail, although the visible area may be narrower.
- Large window: maximizes product visibility, but reduces the area covered by opaque printed or barrier layers.
How does a window affect material structure?
Flexible pouches commonly use multiple layers selected for printability, mechanical strength and product protection. A transparent window may use a clear film section, while the surrounding printed area uses the specified laminate structure. The actual construction depends on the product and the performance target.
For example, a design may combine an outer printable layer, a barrier layer where required, adhesive layers and a clear film section. A metallized or foil-based barrier area and a transparent window do not provide identical light protection. The window area therefore needs to be considered when evaluating the complete package.
Key points to confirm before production
- Product visibility: decide how much of the product should be visible and whether the product needs to be shown from the front or side.
- Barrier requirements: confirm sensitivity to oxygen, moisture and light, and whether the clear window is compatible with the required shelf-life target.
- Window dimensions: provide the preferred width, height, shape and position on the approved pouch dieline.
- Seal and zipper clearance: keep the window away from zipper, top seal, bottom gusset and side-seal areas unless the design has been specifically engineered and tested.
- Artwork registration: review the relationship between the printed graphics, clear film and finished pouch geometry.
- Production validation: approve a physical sample and confirm sealing, appearance and suitability on the intended filling line.
Which window design is right for your product?
There is no single best window shape for every pouch. A simple rectangle may be a practical starting point for nuts or granola, while an oval, round or custom shape may better support a particular brand design. The final choice should balance product visibility, graphic layout, material performance and manufacturing feasibility.
Share your product type, pouch dimensions, target window shape and artwork with your packaging supplier. A dieline review and sample approval can help confirm that the window is positioned correctly before mass production.